|
T Rex Support
Support Topics
More coming soon....
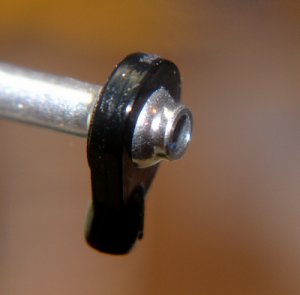
How to Get Ball Links Working Smoothly
Smooth control of your helicopter
depends critically on how well the ball links fit the balls. A
properly fitted ball link will fall due to it's
own weight when the ball is rotated and will have no slop. All
you need is a smooth jaw pliers. Simply squeeze each link
around it's
perimeter (while on the ball) and check the fit. Repeat this
process until the fit is just right. This should be done for
ALL of the links
on the helicopter.
T Rex CDE CCPM Quick Setup Guide
This guide is intended to serve as an overview
for the initial CCPM setup out of the box. Futaba 9CHP and
7CHP radio
terminology
is used which is applicable to other radio brands as well.
Before Starting:
- Disconnect the
motor from the ESC
or unplug the ESC from the receiver and connect a 4.8 volt a flight pack
battery.
- You will need a good quality pitch gauge.
The Align unit works great.
Throttle stick is in the
center position for both photos
STEP 1 - Initial Radio Settings
- Set the swashplate type to SR3 or
equivalent.
- Set the AVT to 100 % for Aileron,
Elevator and Pitch.
- Set the servo reversing (Hitec servos)
to A= Rev, E = Norm , P = Norm.
- Set the swashplate AFR to A= 50%, E= 50%
and P = 30%.
- Throttle curve (Normal) 0, 25, 55, 75,
100
- Pitch curve (Normal) 23, 30, 50, 80, 85
- Throttle curve (Idle 1) 100, 75, 60, 75,
100
- Pitch curve (Idle 1) 0, 25, 50, 75, 95
Note: If you
are using Futaba servos, the reversing settings will be opposite.
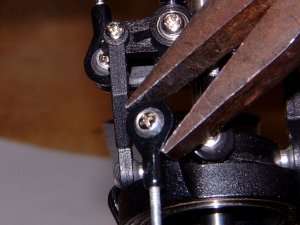
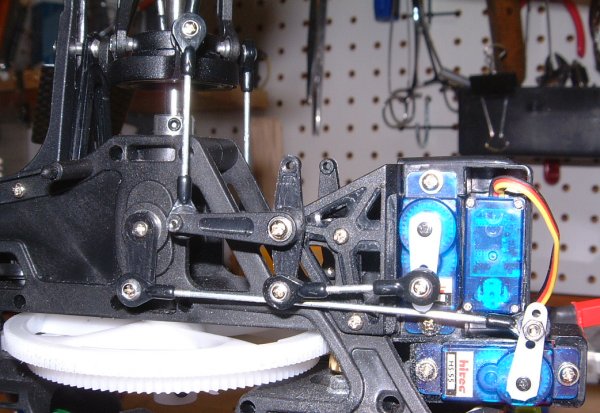
STEP 2 - Upper Links and
Servo Mounting
- Verify that the links A, B, D and E are
the length specified in the users manual.
- Connect links E to the Swashplate and T
arms as shown.
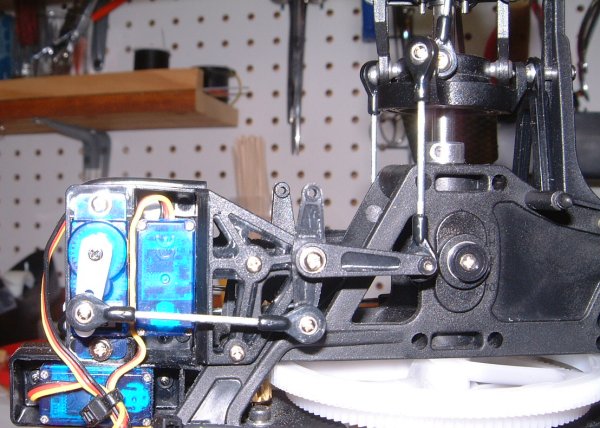
- Mount your servos as shown above.
- With the throttle stick centered, adjust
the servo arms as shown. The goal is to get them pointing up/down.
Use subtrim as needed.
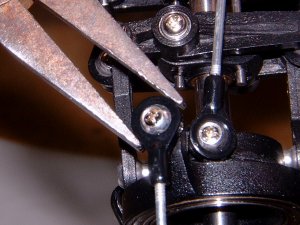
STEP 3- Arm Links to Servos
- Connect the A and P servos links to the
T arms as shown. Adjust the length of the links so that the T arms
are pointing up/down. Try to get the two T arms in the same
position.
- Connect the E servo to the elevator arm
as shown.
- At this point the swashplate should be
sitting level. Adjust the links from "servo to arm" as needed.
If needed,
the links E can be adjusted but they both should be kept the same
length.
STEP 4-
Setting up the blade Pitch (Normal)
- Set the transmitter throttle stick to
the center position. Mode = Normal.
- Measure the pitch with a pitch gauge.
- Adjust the pitch so that it is about
zero. To do this, use a combination of changing links A, changing
subtrim and/or
changing the lengths of "servo to arms" links. Note: Both A links must
remain the same length, The subtrim for A, E, P
servos must change equally and the lengths of "servo to arms" links must
change equally.
- Set the throttle stick to Max.
Measure the pitch. It should be around 8 degrees. This can
be adjusted with point 5 in
the Normal pitch curve menu.
- Set the throttle stick to Min.
Measure the pitch. It should be around -4 degrees. This can
be adjusted with point 1 in
the Normal pitch curve menu.
At this point the helicopter has a basic setup and is flyable in
Normal mode.
The heli should Hover around 55-65% throttle and have a head speed of
2200 to 2400.
To increase head speed, decrease the pitch
and/or increase throttle and visa versa.
This assumes you are using an Align 430LF
(3550 KV) motor with an 11T pinion or similar.
|
STEP 5-
Setting up Idle 1 Mode
- Set the transmitter throttle stick to
the min position. Mode =Idle 1.
- Measure the pitch. It should be
around -10 degrees. Adjust the P parameter in the swashplate AFR
menu.
- Move the transmitter throttle stick to
the max position or until the swashplate hits the washout base. Adjust
point 5 in the Idle 1 pitch curve menu so that at full stick you get
about +10 degrees of pitch and the swashplate
is not binding on the washout base.
Other Settings
- Idle 2 is setup very similar to Idle 1
except point 3 in the throttle curve is set much higher.
Experiment to see what
you like the best for your flying style.
- Negative expo (-30 to -50) on the
elevator and aileron channels will make the heli feel much less twitchy.
- Negative expo (-10 to -20) on the rudder
channel can help smooth out the feel as well.
Copyright © 2006 by Tech Model
Products LLC. • All Rights Reserved |